How to Change WordPress Themes without any issues is a question many digital creators ask. Don’t worry we are here to help you. Creating a visually appealing website is crucial as 75% of visitors perceive a brand’s credibility based on its design. Thankfully, altering the appearance of a WordPress site is as simple as installing a theme, which consists of a set of files responsible for the overall look and feel of the website.
Plenty of free and premium WordPress themes are available in the official theme directory and various marketplaces. Those with a tight budget can choose Free WordPress Event Themes, while performance-oriented users may pick the Best WordPress Themes.
Things to Do Before Changing Your WordPress Theme
Before changing the theme in WordPress, make sure to save the following data from the old theme:
- Code snippets ‒ include all the code that isn’t part of your plugins or the core WordPress software. Alternatively, install a code snippet plugin to keep track of the existing code in a few clicks.
- Google Analytics tracking code ‒ this practice is particularly important if you’ve added analytics code to the current theme. Otherwise, you won’t be able to track your site’s performance after changing WordPress themes.
- Sidebar and widget content ‒ each theme has different sidebar and widget areas, so changing WordPress themes can mess up their visibility or positioning. This step includes making notes of any custom code previously added to these areas.
- Website backup file ‒ backing up your WordPress site is not necessary if you’re working in a staging environment.
Additionally, check your website’s current load speed and performance to ensure the new theme performs better than the previous one.
How to Change WordPress Theme
After taking care of all the necessary requirements it’s time to change WordPress Theme. If you want to change your WordPress Theme without any issues then you have to follow four steps to complete your task with reliability.
Step 1. Enable Maintenance Mode
Enabling maintenance mode in WordPress notifies site visitors that the website is currently undergoing maintenance and unavailable. This feature is valuable for maintaining the credibility of your brand during the transition, particularly when certain features may temporarily become non-functional due to the changes being made.
The most convenient approach is to utilize a plugin such as WP Maintenance Mode to enable maintenance mode. Alternatively, you can create a maintenance mode page using a landing page builder plugin or activate maintenance mode directly from your web host control panel.
These methods do not necessitate any coding knowledge.
Step 2. Install the New WordPress Theme
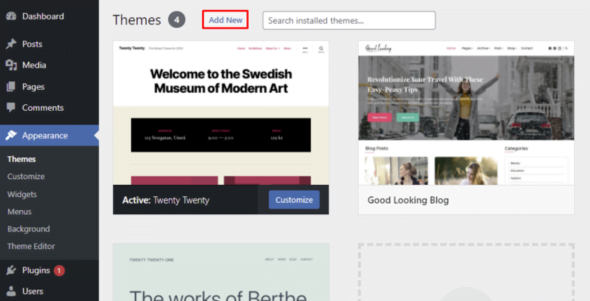
If you are establishing a free theme you can use those themes from the WordPress directory but To install a premium theme, you’ll need to upload the theme files manually. Navigate to Appearance -> Themes from your WordPress dashboard. Click on the Add New button at the top of the page.
1. Navigate to Appearance -> Themes from your WordPress dashboard. Click on the Add New button at the top of the page.
2. Find your desired theme using the WordPress theme search option.

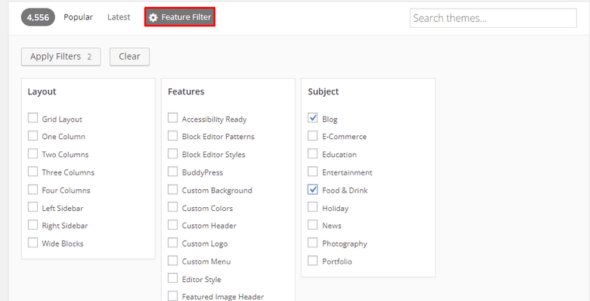
3. Another way to narrow down your options is by using the Feature Filter function. Press Apply Filters after specifying the criteria.
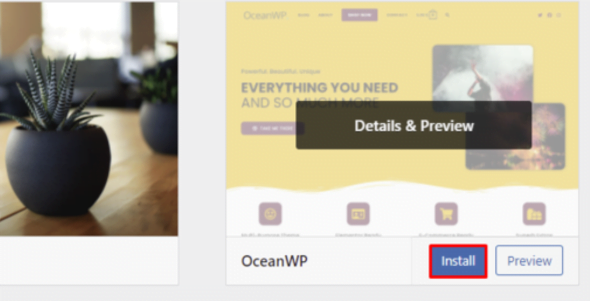
4. Hover over the chosen theme and select Install.
Step 3. Preview and Activate Your WordPress Theme
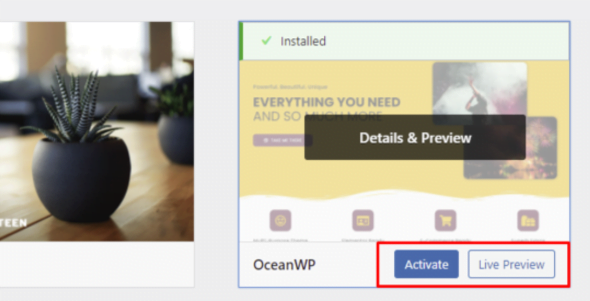
After the installation process is complete, you’ll see the Live Preview and Activate buttons when you hover over the theme.
Clicking Live Preview will open the theme in the WordPress theme customizer, allowing you to preview how the website will look with it. To use the theme right away, select the Activate button.
Step 4. Fix Errors and Re-Add the Custom Code Snippets
Before deploying the changes to the live site, it is crucial to restore all data, custom code, and settings from the previous theme since the new theme will remain unaltered. To ensure a comprehensive setup, the following checklist should be followed diligently.
- Code ‒ add code snippets, theme-specific shortcodes, tracking code, and sidebar content. The layout of the sidebars might also change, so check and re-adjust the positioning of widgets accordingly.
- Pages ‒ check and re-adjust the layout and formatting of the widget areas across the WordPress site.
- Favicon ‒ make sure the favicon is working properly. Otherwise, re-add it via the WordPress customizer.
- Schema markup ‒ if you used a plugin to add and manage the data, the theme transition shouldn’t affect the schema markup. Otherwise, you’ll need to re-configure the new theme manually.
- Plugins ‒ since some themes come with pre-installed plugins and theme-specific features, you’ll want to ensure they don’t clash with your existing plugins.
- Website content ‒ changing WordPress themes shouldn’t affect the site’s existing content, but you should still make sure everything is in its place.
- Cache ‒ open your WordPress website in several browsers and clear the cache. Doing so will flush out any static files of the site before the theme changes, ensuring a good user experience once it goes live.
Moreover, If you tested the new WordPress theme without going live, remember to copy the staging site to the main website and then push it live.
Problems Solved by Switching to New Theme
Installing new WordPress themes can give more than just a new look to your site. This method is also effective for solving the following problems:
- Outdated design ‒ more new themes with newer designs populate the marketplace today, allowing you to keep up with the latest UX trends and maintain a fresh look across the entire site.
- Theme limitations ‒ your currently installed theme may not have the functionality the site needs, calling for a new WordPress theme.
- Slow loading time ‒ installing an optimized WordPress theme can improve the site’s speed and performance.
- Security concerns ‒ switching from a nulled theme to a licensed one is a great practice to secure your WordPress website. Avoid nulled themes as they often contain malicious code that creates vulnerabilities upon installation.
- Incompatibility with WordPress and PHP version ‒ if updating the active theme doesn’t solve compatibility issues, WordPress users are encouraged to switch to a theme that’s compatible with their current updated WordPress and PHP versions.
Conclusion
While sticking with a single WordPress theme may be convenient, transitioning to a new theme can offer numerous advantages for your website. In addition to refreshing its appearance, a new theme has the potential to address various issues and introduce enhanced functionality.
We trust that this article has provided you with valuable insights into the proper process of changing a theme in WordPress—best of luck with your endeavors.
